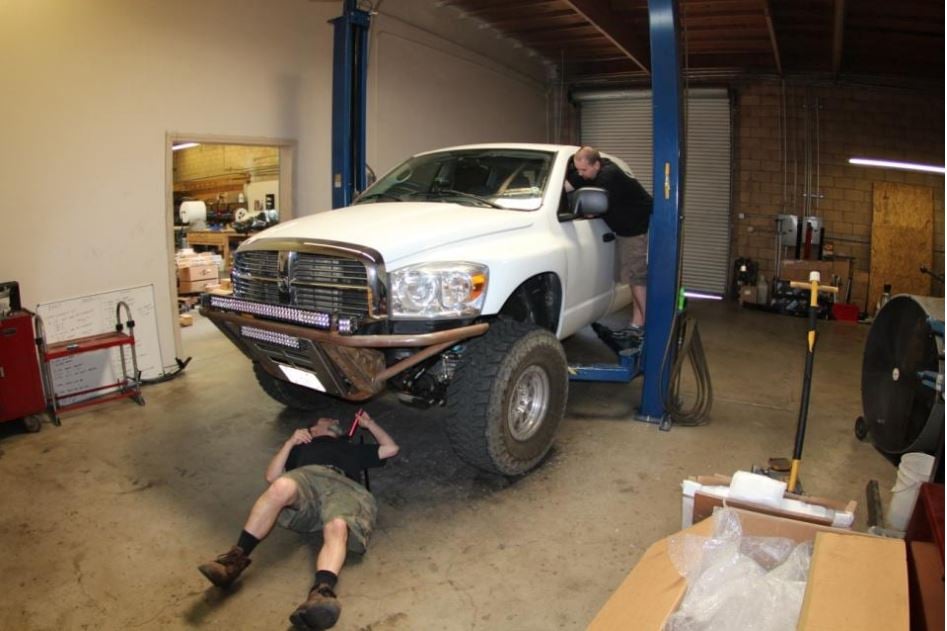
We, at Diesel Power Products, recently ran across an excellent write up covering the ins and outs of Death Wobble written by our friends over at Carli Suspension. These guys are specialists in Dodge and Ford suspension, which means they also excel at the steering in these applications and how to improve it. While this article was originally written December 14, 2012, it still applies every bit now as it did back then.
Let’s start with a statement to ease your mind; Death Wobble is not YOUR problem; it’s not even a Dodge problem. Death Wobble is a problem that has plagued straight axle vehicles of all kind since their inception. Straight axle front ends are far stronger than their IFS counterparts but are equally as finicky once components start to wear. Combine the aforementioned with the weight of a Cummins diesel motor and you have a recipe for disaster. The good news is, with the proper precautions and maintenance, death wobble is 100% avoidable.
Death Wobble is most commonly attributed to one or many of the following parts:
- Tires
- Track bar
- Steering Components
- Control Arms
This article will be the first comprehensive write-up to cover the causes, diagnostics and solutions for death wobble specifically with the Dodge Ram, Heavy Duty trucks. This document will start on the next page with the first category and most common cause of Death Wobble, tires.
TIRES:

When choosing a tire for a Heavy Duty Ram, there are a few factors to consider; none more important than the load rating. These vehicles range from the mid 7-10,000lbs. depending on how they’re equipped. Being the interface by which the vehicle maintains traction with the road, tire choice should not be taken lightly.
The first thing to consider is the load rating. Tires come in several load ratings which categorize tires based on the amount of weight each tire can support while operating under everyday conditions. We recommend running an E-Rated (10 Ply) tire. This is the case for all on and off-road, loaded and unloaded. Most tires with an E-Rating have substantially stronger construction in their tread and sidewall than lesser rated tires.
The tire brand that we have the most luck with is Toyo Tires. The construction of their E-Rated, Open Country Mud Terrains and All-Terrains, have been tested by our customers time and time again with great result. We recommend running the largest tire size that one can fit given it provides the largest sidewall and, when run at proper inflation pressures, helps absorb the road imperfections that can be translated into the front end play causing death wobble.
One manufacturer we recommend avoiding is BF-Goodrich. Their AT/KO all terrain tires and KM2 Mud terrains have been known to cause death wobble in the heavy-duty Ram Trucks. They’re a great tire but seem better suited to the light truck and independent front suspension application. Although they come in a 10-Ply, E-Rated tire, we find their sidewall strength doesn’t pair well with the demands of the heavy duty Dodge and Ford trucks and, as mentioned above, sidewall strength is equally as important to consider as tread construction when selecting tires for your 8,000lb. vehicle.
Tire wear can also cause death wobble. We recommend rotating your tires every oil change and ensuring there is sufficient tread with no dry rot or cracks in the rubber. In short, ensure you’re purchasing an E- Rated tire with ample sidewall and proper sidewall construction from a reputable manufacturer. Rotate them often and replace them when it’s time. This will minimize the likelihood that the death wobble you’re experiencing (or trying to prevent) is a byproduct of the tires you’re running.
TRACK BAR:
Only second to improper tire choice, the second most common cause of death wobble is deflection of the factory track bar. There are many names associated with the lateral link between your axle
and frame rail; most commonly: Pan-Rod Bar, Panhard Bar, and Track Bar. We refer to this link as a track bar. The duty of this bar cannot be overstated; it is the link between your axle and frame and is BOTH a suspension and steering component. The factory uses a steel bar with small, vulcanized bushings at both ends. This, of course, leads to a few issues.
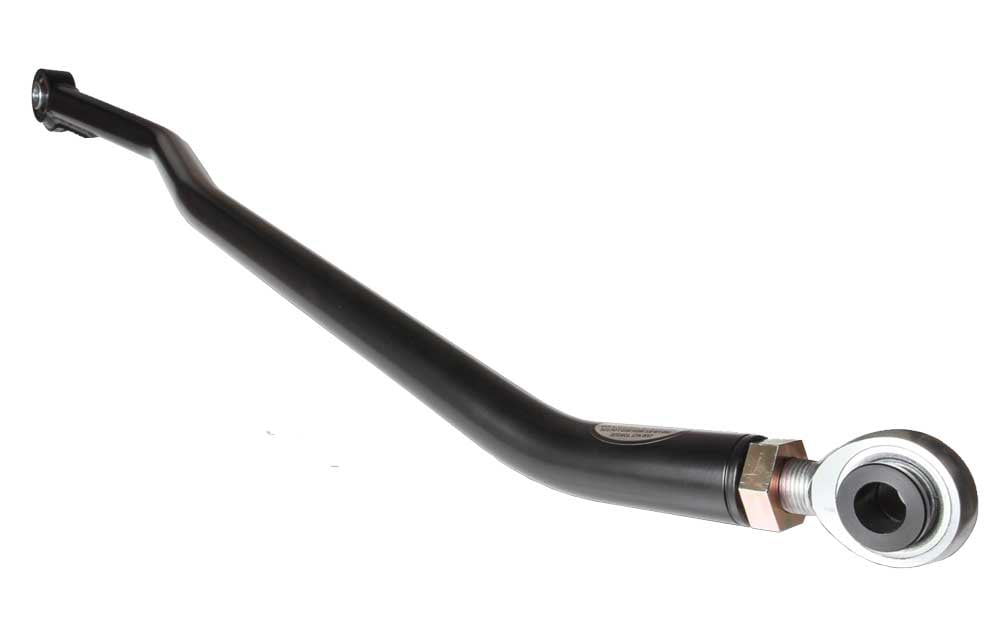
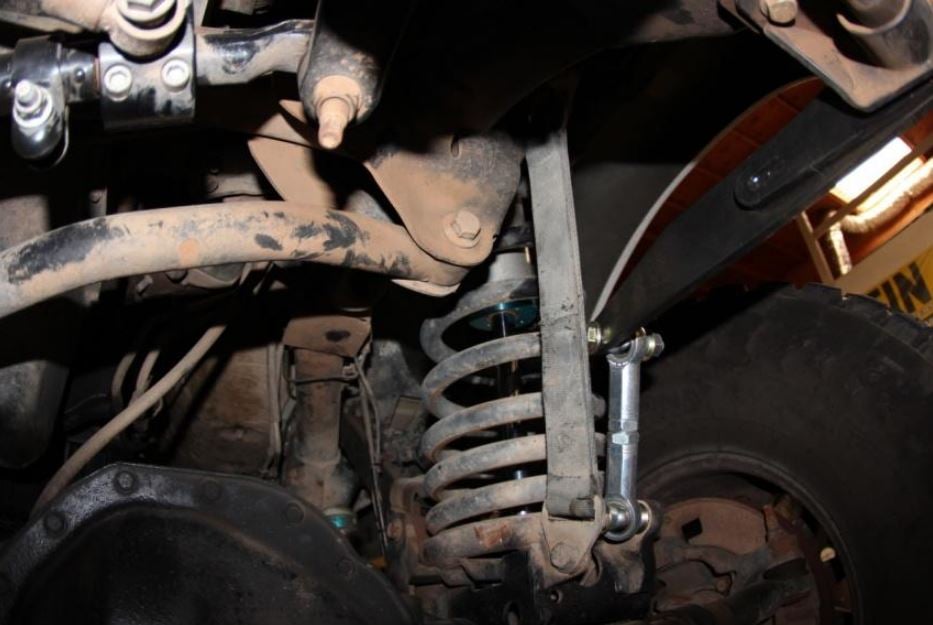
The vulcanized bushings will only allow so much movement before binding. Given the strength needed to control this lateral movement of the front axle under the force applied, we always recommend replacing the worn out stock unit with Carli’s adjustable track bar. The Carli bar is universal as it will work with any stock height vehicle, leveled vehicle, or lift that utilizes a drop bracket meant for a stock length track bar. The Carli Track Bar, CS-PRB-94 (now superseded to CS-DATB-03 and CS-DATB-14), is constructed from .250” wall Chromoly tubing. One side houses a proprietary urethane bushing (now superseded to a Carli CUB Captured Uniball Bearing and JAMMIT Nut) and machined crush sleeve while the other utilizes an industry leading, heat treated, Chromoly FK Bearing Heim Joint measuring 7/8”. The heim joint allows the bar to rotate without binding during articulation while maintaining a solid link with minimal deflection while the bushing allows for free vertical movement, no horizontal movement and will not bind.
Many replace their track bar immediately, some wait until they find sufficient wear in their stock track bar. The first step to ensuring a tight track bar requires a two man team. Block the rear wheels for safety and have a friend start the motor and sit in the driver’s seat. Ensure the wheels are pointing straight ahead. Hold a flashlight on the upper track bar bolt and give the driver the “OK” to begin rocking the wheel back and forth. While under the truck, watch the upper track bar mount carefully. There should be no movement of the upper bolt or track bar.
If….
- The bolt and track bar are moving, improper torque was applied to the bolt during the installation of the track bar. This will oblong the mounting hole and possibly destroy the bushing. The mount must be fixed and the track bar (if stock) must be replaced or the bushing (if Carli Track bar) should be replaced once the mount is repaired. When installing the bar after bushing replacement, ensure 14mm bolt (18mm Head) is torqued to 185 ft.lbs. If the upper bolt is the 16mm Bolt (21mm head), torque to 215 ft.lbs.
- The bolt doesn’t move but the bar moves, this is a less severe version of the above bullet point. This means that improper torque was applied and the play hasn’t had sufficient time to oblong the bolt hole. Replace the track bar if stock or replace the bushing if you’re performing the diagnostic on a Carli Track Bar. When installing the bar after bushing replacement, ensure 14mm bolt (18mm Head) is torqued to 185 ft.lbs. If the upper bolt is the 16mm Bolt (21mm head), torque to 215 ft.lbs.
- There is no measurable play in the Upper Bolt or Deflection in the Track Bar Bushing, the upper bushing in the track bar is good and the bolt most likely has sufficient torque. Put a torque wrench on the upper bolt to ensure the 14mm bolt (18mm Head) is torque to 185 ft.lbs. If the upper bolt is the 16mm Bolt (21mm head), torque to 215 ft.lbs.
This same test should be performed to the bushing (if stock track bar) or heim joint (if Carli Track Bar) on the axle end of the track bar. The same diagnostics and solutions apply as above. If there is measurable play found in a Carli Heim Joint, a new Heim Joint (PN: AP-TBRE) can be ordered from your local Carli Suspension dealer or online retailer. Ensure to take note of the eye to eye measurement of the track bar before removing the old heim. Once the old heim is removed, thread the new one in, set it to the exact measurement of the bar when it was removed and tighten the jam-nut to 150ft.lbs. Install the rebuilt track bar and tighten the 14mm bolt (18mm Head) to 185 ft.lbs. If axle side bolt is the 16mm Bolt (21mm head), torque to 215 ft.lbs. Performing the above will ensure your Death Wobble is not being caused by your track bar!
STEERING COMPONENTS
Death wobble can be caused by “slop” in the front end components. More prevalent than anywhere else, play in steering components happens due to the amount of leverage applied to these parts over prolonged periods. People often get annoyed at how often they replace gearboxes and tie-rod ends but in all actuality, most get decent life out of them and replacement parts are reasonable. To diagnose play in the steering, start at the top!
Steering Gearbox:
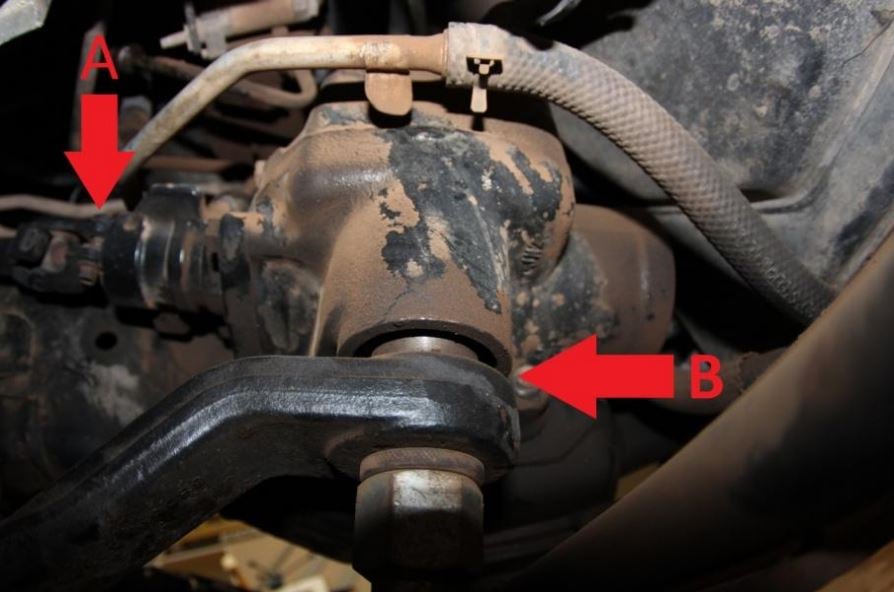
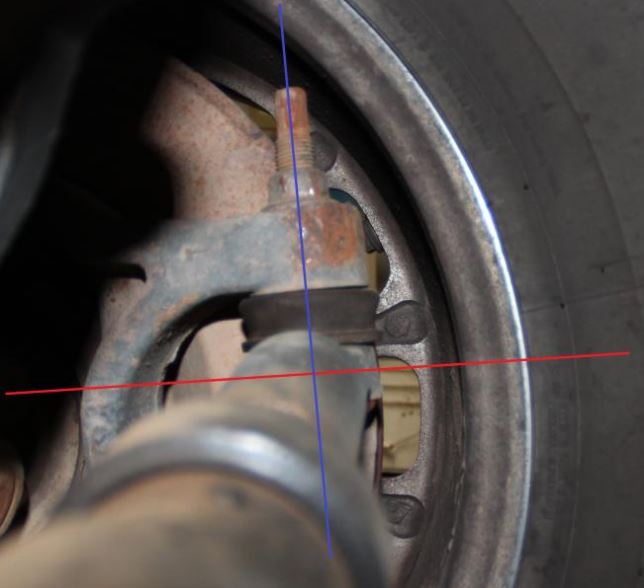
Block the rear tires for safety and have a friend sit in the driver’s seat and turn the key on without starting the vehicle while you get underneath the truck and watch the sector shaft and intermediate shaft. Instruct your helper to begin rocking the wheel back and forth as much as possible without the motor on. While they’re rocking the wheel, keep your eye on the movement of the intermediate shaft-steering gearbox input (the part of the gearbox that faces the firewall denoted by Arrow A) vs. the amount of movement of the sector shaft (the shaft protruding from the gearbox to which the pitman arm connects denoted by Arrow B). If you can get the intermediate shaft to move without moving the sector shaft, the gearbox is worn and should be replaced. Also watch for vertical and horizontal movement of the sector shaft within the housing as this also signifies a worn Steering Gearbox. Many also elect to stabilize the steering gearbox as the factory doesn’t provide enough stabilization for the amount of leverage applied to the box. This will cause the sector shaft to oscillate rather than rotate; thus causing play and destroying the gearbox. Many aftermarket manufacturers make a brace that uses the sway bar mounting locations to brace the sector shaft on the outermost leverage point to combat steering wander and death wobble. We have the best luck with the PSC brace given it clears our torsion sway bar. If no independent movement of the intermediate shaft and sector shaft can be detected, the intermediate shaft and
gearbox are in good shape and you can move onto the steering linkage.

Steering linkage:
Steering linkage wear is more common than any other part of front end wear given the amount of force on the tie-rod ends at any given time. Just as with the track bar test, block the rear wheels and have a buddy get behind the wheel, turn the motor on and watch for any movement in the steering linkage at all points of connection. Specifically, watch the tie rod ends and ensure they have NO visible play. Any visible play and the tierod end, or that portion of the linkage, should be replaced.
There are two types of steering linkage factory installed on the front ends of these vehicles; these are most commonly referred to as: “Y” and “T” style. These can be identified by the following picture:
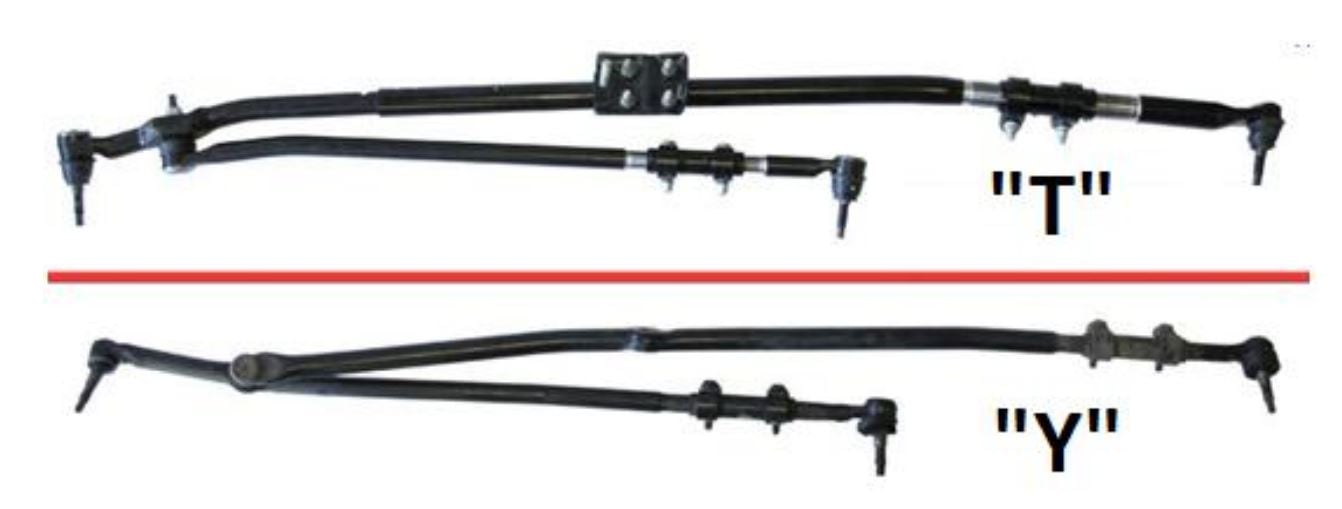
“Y” style was factory installed on 94-2008 Ram 2500 and 3500 trucks. In some 1998-1999 trucks, there was an option for the “T” style steering but it is mainly found on the 2008.5+ vehicles; thus it’s often referred to as the “08.5+ steering upgrade.” Mopar no longer manufactures the “Y” style steering so there isn’t much of a choice if one is looking to replace linkage. We find the Y-style has better geometry and less bump steer while the T style is stronger but more susceptible to bump steer in all circumstances. Given the strength increase of the 08.5+ linkage, we recommend upgrading to the T style as any strength upgrade is welcomed in the Dodge front end.
When installing the steering upgrade or aligning the vehicle, ensure to properly position the tie-rod ends. What often happens is one will install the new linkage; then, during alignment, they’ll adjust the alignment sleeve on the tie rod or drag link to achieve the proper toe-in/steering wheel position and not realize the adjustment “clocks” the tie-rod end whichever way the sleeve is spun. Always re-align your vehicle’s “Toe” after installing new tie-rod ends or linkage. After realignment ensure ALL tie-rod ends are perfectly perpendicular to the steering knuckles and pitman arm at ride height with the weight of the vehicle on the suspension. This will ensure proper operation during articulation. If the above procedure isn’t followed, improper orientation can cause steering linkage to bind and fail.
How to properly align the Vehicle:
“Y” Style: 0” Toe In. Ensure the tires are pointing straight ahead. Put a straight edge to the tire sidewall that extends beyond the front and rear of the tire. Have a friend do this on the other side as well. Run a tape measure under the truck from straight edge to straight edge and adjust the steering linkage until the measurements are identical; you’re now properly toed for the “Y” Linkage.
“T” Style: 1/16”- 1/8” Toe In. Ensure the tires are pointing straight ahead. Put a straight edge to the tire sidewall that extends beyond the front and rear of the tire. Have a friend do this on the other side as well. Run a tape under the truck from straight edge to straight edge and adjust the steering linkage until the front measurement is 1/16”-1/8” less than the rear measurement; you’re now properly toed for the “T” Linkage. Again, after the above alignment is performed, please ensure the tie-rod end – Knuckle/Pitman Arm connections are perpendicular at ride height to allow for the joint to function properly during articulation! Not completing this last step can lead to failure of the steering linkage. The above addresses Toe, camber is non-adjustable and Carli’s technicians always adjust caster by pointing the position marker on the lower control arm eccentric bolts to the 12 o” clock position. This is not the perfect location for every truck but a great starting point by which to adjust caster. The 12 o’ clock position works great in the 1994-2009 trucks. Due to the larger U-Joints in the driveshaft of the 2010+ trucks, we recommend setting the eccentric bolts slightly negative to prevent driveshaft vibration. Please ensure the eccentric bolts are not pointing in opposite directions as this will accelerate wear on the control
arm bushings. Whatever adjustments are made to one side should be mirrored on the other.
Steering Stabilization:
The next step is ensuring proper stabilization of the steering linkage. First and foremost, never run without a steering stabilizer. As stated above, there are a lot of forces being applied to the steering linkage at all times and these forces should be mediated with some type of stabilizer. To stabilize the steering, Carli offers a replacement style 5100 lower steering stabilizer for the “Y” style linkage that is stronger than the stock unit and will compensate for slightly larger tires. When combined with our high mount steering stabilizer, this combination will make a truck with 40” tires feel like a stock truck rolling down the road with very minimal steering wheel feedback.
For the T-Style, we offer a 7100 series direct replacement stabilizer that utilizes the factory clamp on the
tie-rod and provides adjustability for larger tires (such as Toyo’s with their notorious right-hand pull) without the use of a high-mount as well. The high mount can be added but in most cases is not needed for the 08.5+ steering unless utilizing 37”+ tires or if the vehicle spends time off-road. The adjustable nitrogen pressure of this shock can compensate for left and right hand tire pull with different bracketry (referenced later) offered by Carli. Once installed, one can use air pressure to find the proper PSI needed to compensate for tire pull, then record that pressure, release the air pressure and fill it to the noted pressure with nitrogen.
If one is combating severe left hand pull, Carli offers an opposing steering stabilizer utilizing our standard high mount and a low mount 7100 with a differential guard and bracket that will allow the push to be reversed to the passenger side rather than pushing toward the driver’s side as stock stabilizer does. Both upper and lower opposing force shocks are adjustable and can compensate for any tire pull, push or be set to neutral.
Once all steering linkage is tight, properly aligned, stabilized and free of play, you can move onto the ball joints.
Ball Joints:
Another common cause of death wobble in the 2003-2012 HD Doges is worn ball joints. Stock joints normally last anywhere from 20,000- 60,000 miles but we’ve seen both extremes happen from sets lasting 5,000 to 100,000 miles. Due to this inconsistency, it is imperative to check your ball joints for play often. You will, again, need a buddy to help you in the diagnostic process.

Procedure:
- Block the rear tires for safety and jack up the font of the truck; then, support the axle with proper jack stands once the weight of the truck is off the ball joints.
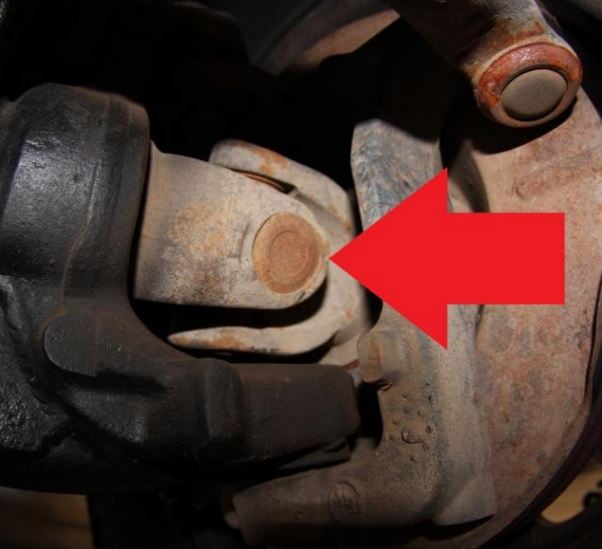
- Have your assistant place their hands at 12 and 6 o’ clock and rock the tire vigorously while you watch the upper and lower ball-joints for deflection. This will highlight play in the uppers more so than the lowers. (See Arrow A and B)
- If there is substantial visible movement in either, they should be replaced. A very small amount is OK.
- If it’s difficult to detect movement, have your assistant apply more leverage to the bottom of the tire to increase the chance of deflection in a bad joint. This will highlight play in the lowers.
- While the weight of the vehicle is off the joints, have your assistant place his hands at 12 and 6 o’ clock and rock the tire with force and watch for deflection in the wheel bearing. If there is play, replace the wheel bearings as this is far easier to do while you’re installing your new ball joints than to tackle separately. Bad wheel bearings can also be diagnosed by a “humming” sound when driving around corners or grinding noise when spinning the tires.
- Also, check the axle u-joints for while the truck is off the ground. Inspect the U-joint caps for rust. If rust is found around the seal, there is rust contaminating the u-joint and it should be replaced. Next, check them for play. If the axle u-joints are bad, play will be detectable by grabbing and moving them by hand. If they’re tight, move onto the next step in the diagnosis.
If deflection is found in the ball joints, Carli Suspension makes the industry’s best ball joints that carry a lifetime, advance replacement, warranty. The test truck has had these extreme duty ball joints in the axle since 2008 and around 60,000 miles of Baja terrain (the owner of the truck lived in a remote part of Baja, Mexico) and they have no measurable play. Carli’s ball joints carry a lifetime Advance replacement warranty; this means, if you can provide evidence of the play in the joint, we’ll send you a set to replace the worn joints up front to minimize downtime. Once you get the new joints in, throw the old ones in the box and send them back for review!
Once you’re confident your tires are in good shape, the intermediate shaft, steering gearbox, steering linkage, ball joints, unit bearings, and u-joints are all free of play, you can move onto the least common cause of Death Wobble, the control arms.
CONTROL ARMS:
Control arms have only been the cause of death wobble in a few cases we’ve experienced. Once all of the above have been performed, the death wobble should cease. If it is still prevalent; check your control arms. The factory arms are weak, stamped steel with vulcanized bushings. These bushings are prone to developing play and any rock or hard hit that contacts the arm will cause it to crumple given the crumple zone in the factory arms.
If you’re going to continue to run stock control arms, remove and inspect all joints to ensure there are no tears in the vulcanized bushings. If all is tight and the death wobble is gone, you’ve successfully completed the diagnostic of the entire front end. If the bushings are worn or torn, replace the arms. Stock arms are rather expensive and this would be a great time to look into upgrading.
As stated above, reducing friction and play will reduce the likelihood of any wobble picking up momentum in your front end. Carli’s control arms should only be utilized in a leveled application, although several trucks have successfully run them on stock height vehicles we do not recommend it (radius arms to be utilized in 6” applications). The control arms are made from mig welded mild steel and tig welded Chromoly and utilize a much stronger Johnny Joint (shown below) in addition to their superior construction. What this means to the customer is more articulation given the reduction in friction and less play in the joint as they’re converted to more of a spherical bearing. Once the Carli arms are installed and all parts are free of play, you will have a rock-solid front end!
One thought on “The “Death” of Death Wobble – Originally written by Carli Suspension”